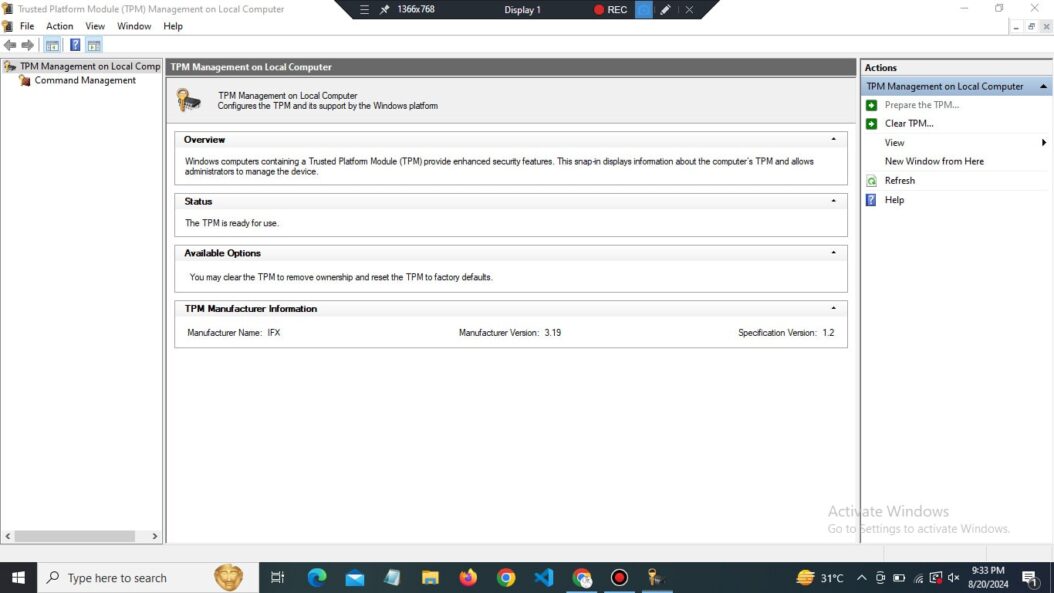
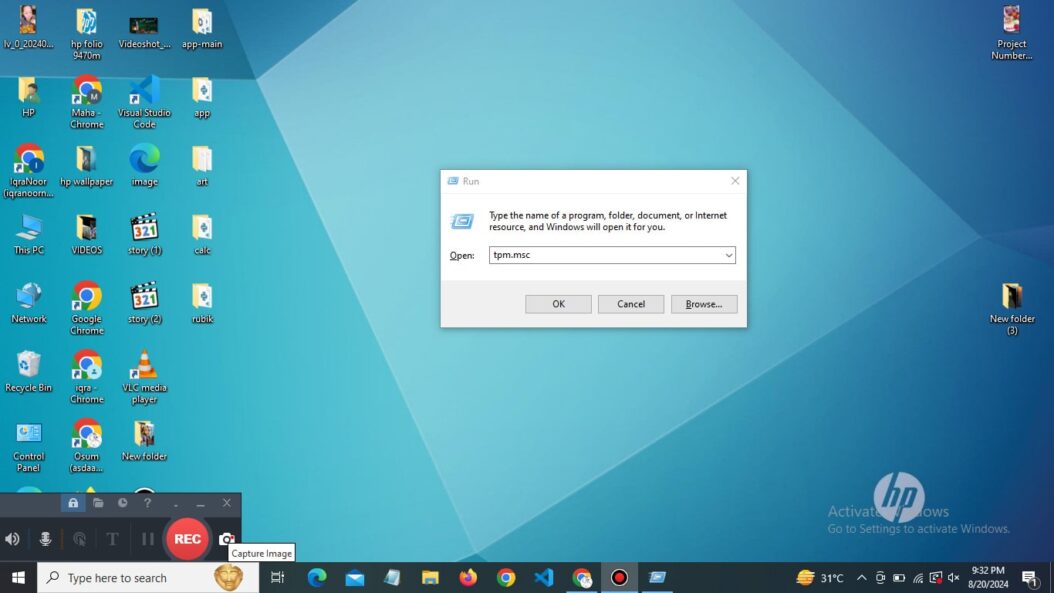
The tpm.msc command opens the TPM Management Console in Windows, allowing users to access and manage Trusted Platform Module (TPM) settings. TPM enhances system security by storing cryptographic keys and ensuring the integrity of hardware and software. Using tpm.msc, you can initialize TPM, manage TPM ownership, clear TPM, and troubleshoot TPM related issues. It’s essential for configuring TPM based features like BitLocker encryption and Secure Boot.
As we store more sensitive information on our devices, the need for robust protection mechanisms has never been greater. Enter the Trusted Platform Module (TPM) a tiny but powerful chip that’s revolutionizing computer security. But how do we access and harness its power? That’s where the tpm.msc command comes into play. In this comprehensive guide, we’ll dive deep into the world of TPM and explore how the tpm.msc command can help you leverage this security powerhouse on your Windows system.

What is TPM?
Before we jump into the nitty-gritty of the tpm.msc command, let’s take a moment to understand what TPM actually is.
A Brief Overview of TPM
TPM, or Trusted Platform Module, is a specialized chip on your computer’s motherboard that provides hardware security functions. Think of it as a digital safe for your sensitive information. It’s designed to protect your data from external software attacks and physical theft.
Key Functions of TPM
- Encryption: TPM can generate, store, and limit the use of cryptographic keys.
- Authentication: It provides a root of trust for the platform, ensuring that the system boots into a trusted state.
- Attestation: TPM can attest to the health of your system, proving that it hasn’t been tampered with.
The Evolution of TPM
TPM has come a long way since its introduction. As of 2025, most modern computers come equipped with TPM 2.0, which offers enhanced security features compared to its predecessors.
| TPM Version | Key Features |
|---|---|
| TPM 1.2 | Basic encryption and key storage |
| TPM 2.0 | Improved algorithms, enhanced authorization mechanisms |
Understanding the tpm.msc Command
Now that we’ve got a handle on TPM itself, let’s explore the tool we use to interact with it – the tpm.msc command.
What is tpm.msc?
The tpm.msc command is a Microsoft Management Console (MMC) snap-in that provides a graphical user interface for managing your computer’s TPM. It’s your gateway to accessing and configuring TPM settings on Windows systems.
How to Access tpm.msc
Accessing tpm.msc is straightforward. Here’s how you can do it:
- Press Win + R to open the Run dialog.
- Type “tpm.msc” and hit Enter.
- If prompted by User Account Control, click “Yes” to allow the program to run.

Navigating the TPM Management Console
When you launch tpm.msc, you’ll be greeted by the TPM Management console. Let’s break down its main components:
Status
This section gives you an at-a-glance view of your TPM’s current state. You’ll see information like whether TPM is ready for use, enabled, and activated.
Actions
Here, you’ll find various TPM-related tasks you can perform, such as preparing the TPM for use or clearing TPM data.
TPM Manufacturer Information
This area provides details about your TPM chip, including the manufacturer, version, and specifications.
Using tpm.msc to Manage Your TPM
Now that we’re familiar with the interface, let’s explore how to use tpm.msc to perform some common TPM management tasks.
Preparing the TPM for Use
Before you can start using your TPM, you need to prepare it. Here’s how:
- In the TPM Management console, click on “Prepare the TPM” under Actions.
- Follow the wizard’s instructions to initialize the TPM.
- You may need to restart your computer to complete the process.
Turning TPM On or Off
Sometimes, you might need to enable or disable your TPM. Here’s the process:
- In the TPM Management console, look for the “Turn TPM On/Off” option.
- Click on it and follow the prompts.
- Again, a system restart might be necessary.
Clearing the TPM
If you need to reset your TPM to its factory default state, you can clear it:
- In the Actions pane, click on “Clear TPM.”
- Confirm your action and follow the instructions.
- Be aware that this will erase all data protected by the TPM.
Advanced TPM Management with tpm.msc
For those who want to dive deeper, tpm.msc offers some advanced management options.
Managing TPM Ownership
TPM ownership is a crucial concept in TPM security. Here’s how to manage it:
- In the TPM Management console, look for “Change Owner Password” in the Actions pane.
- Follow the prompts to set or change the TPM owner password.
Backing Up the TPM Owner Information
It’s crucial to back up your TPM owner information:
- In the Actions pane, click on “Backup the TPM owner information.”
- Choose a secure location to save the backup file.
- Keep this file safe, as it’s essential for recovering TPM access.
TPM and BitLocker: A Powerful Duo
One of the most common uses of TPM is in conjunction with BitLocker, Windows’ built-in drive encryption feature.
Enabling BitLocker with TPM
To use BitLocker with TPM:
- Open File Explorer and right-click on the drive you want to encrypt.
- Select “Turn on BitLocker.”
- Follow the wizard, which will automatically use your TPM if available.
Managing BitLocker with tpm.msc
While tpm.msc doesn’t directly manage BitLocker, it ensures that your TPM is ready for BitLocker use. Always keep your TPM properly configured through tpm.msc to ensure smooth BitLocker operation.
Troubleshooting TPM Issues
Even with a tool as robust as tpm.msc, you might encounter some issues. Let’s look at some common problems and their solutions.
TPM is Not Ready
If you see a “TPM is not ready” message:
- Check if TPM is enabled in your BIOS/UEFI settings.
- Use tpm.msc to prepare the TPM for use.
- If problems persist, consider updating your BIOS and TPM firmware.
TPM is Not Detected
If your system doesn’t detect the TPM:
- Verify that your computer has a TPM chip.
- Check if it’s enabled in the BIOS/UEFI.
- Update your system drivers and BIOS.
Error Codes in tpm.msc
Here’s a table of common error codes you might encounter:
| Error Code | Meaning | Possible Solution |
|---|---|---|
| 0x80280013 | TPM is disabled in BIOS | Enable TPM in BIOS settings |
| 0x80280014 | TPM is not detected | Check hardware and BIOS settings |
| 0x80284007 | TPM is locked out | Wait for the lockout period to end or clear TPM |
Best Practices for TPM Management
To get the most out of your TPM and tpm.msc, consider these best practices:
- Regular Updates: Keep your system, BIOS, and TPM firmware up to date.
- Backup: Always backup your TPM owner information.
- Strong Passwords: Use robust, unique passwords for TPM ownership.
- Monitor: Regularly check your TPM status using tpm.msc.
- Documentation: Keep records of any changes you make to your TPM configuration.
Conclusion
The tpm.msc command is a powerful tool in your Windows security arsenal. By providing easy access to your computer’s Trusted Platform Module, it empowers you to take control of your system’s hardware based security features. From basic TPM preparation to advanced management tasks, tpm.msc offers a user-friendly interface for interacting with this crucial component.
As we’ve explored in this guide, understanding and properly utilizing TPM through tpm.msc can significantly enhance your computer’s security posture. Whether you’re using it in conjunction with BitLocker for drive encryption or leveraging its authentication capabilities, TPM is a cornerstone of modern computer security.
Remember, while tools like tpm.msc make TPM management more accessible, it’s still a complex technology. Always approach TPM configuration with caution, and don’t hesitate to seek expert help if you’re unsure about any steps.
By mastering the use of tpm.msc, you’re not just learning about a command – you’re taking a significant step towards a more secure computing experience. So go ahead, open that Run dialog, type “tpm.msc,” and start exploring the world of hardware security!
FAQs
Can I use tpm.msc on any Windows version?
While tpm.msc is available on most modern Windows versions, its functionality may vary. It’s fully supported on Windows 10 and Windows 11, but older versions may have limited features.
Is it safe to clear my TPM using tpm.msc?
Clearing your TPM is safe but will erase all data protected by the TPM. Only do this if you’re sure you won’t need the encrypted data or if you’re preparing to transfer ownership of the device.
What should I do if tpm.msc shows that my TPM is not compatible?
If tpm.msc indicates that your TPM is not compatible, first check if your system meets the minimum requirements for TPM usage. If it does, try updating your BIOS and system drivers. If the issue persists, you may need to contact your computer manufacturer for support.
Can I use tpm.msc to upgrade my TPM firmware?
While tpm.msc can show you your current TPM version, it doesn’t typically handle firmware upgrades. For TPM firmware updates, you’ll usually need to go through your computer manufacturer’s update process.
How often should I check my TPM status using tpm.msc?
It’s a good practice to check your TPM status monthly or after any significant system changes. Regular checks can help you catch and address any issues early.
- What is One Challenge in Ensuring Fairness in Generative AI: The Hidden Bias Problem - August 15, 2025
- How Small Language Models Are the Future of Agentic AI - August 15, 2025
- What Are the Four Core Characteristics of an AI Agent? - August 15, 2025
