Moving a column in Excel sounds simple, but if you’ve done it wrong, you know the pain. You drag it, drop it, and Excel asks if you want to replace the existing column. You click OK, and suddenly your data is gone. Or you cut and paste, and the original column disappears but lands in the wrong spot.
The Quickest Way to Move a Column in Excel
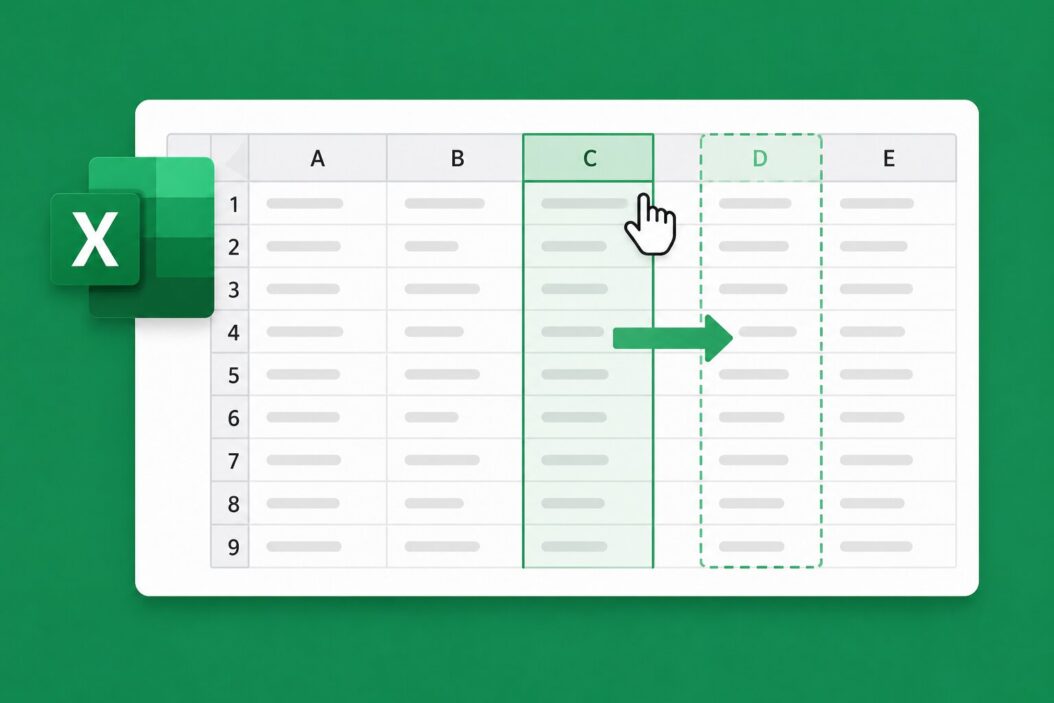
The fastest method is the drag-and-drop with Shift key trick. It moves your column without overwriting anything.
Here’s exactly how I do it:
- Click the column letter at the top (like B or D) to select the entire column
- Hover your mouse over the edge of the selected column until the cursor turns into a four-sided arrow
- Hold down the Shift key on your keyboard
- Drag the column to the new position
- Release the mouse, then release Shift
You’ll see a thick green line appear between columns as you drag. That line shows exactly where the column will land. When you release, the column slots in cleanly without replacing anything.
This works in Excel 2016, 2019, 2021, and Microsoft 365.
How to Move a Column Using Cut and Insert
If drag-and-drop feels tricky, this method is more controlled and 100% reliable.
Step-by-step:
- Click the column letter to select the whole column
- Right-click and choose Cut (or press Ctrl + X)
- Right-click on the column to the right of where you want it to go
- Choose Insert Cut Cells
That’s the key move most people miss. You don’t just paste. You right-click and select Insert Cut Cells. Regular paste will overwrite the column that’s already there.
If you use Ctrl + V instead of Insert Cut Cells, Excel will paste into the existing column and delete whatever was there. Always use Insert Cut Cells.
Moving Multiple Columns at Once
You can move more than one column at a time using either method above. Here’s how to select multiple columns:
- Click the first column letter, hold Shift, then click the last column letter to select a range
- Or hold Ctrl and click individual column letters to select non-adjacent ones
Then use the Shift-drag method or the Cut > Insert Cut Cells approach. Both work the same way with multiple columns selected.
One caveat: Non-adjacent columns (selected with Ctrl) can’t be moved with Cut and Insert at the same time. Excel will give you an error. For those, you’ll need to move them one by one or rearrange them using a different approach like Power Query.
Moving a Column in Excel Tables (Structured Tables)
If your data is inside an Excel Table (the kind you create with Ctrl + T), moving columns works slightly differently.
- The Shift-drag method still works inside a table
- Cut and Insert Cut Cells also works
- But you cannot drag a column outside the table boundary using this method
One thing I like about tables: when you move a column, all formulas that reference that column by its header name (like [@Revenue]) update automatically. You don’t have to fix references manually.
Moving Columns Without Changing Formulas
This is where people run into trouble. If you have formulas referencing specific cells, moving a column can break those references or cause unexpected results.
Here’s what actually happens:
| Scenario | What Excel Does |
|---|---|
| You move a column using Cut + Insert | Cell references in formulas update automatically |
| You copy a column to a new spot manually | References stay pointing to the old location |
| You use drag-and-drop with Shift | References update just like Cut + Insert |
| You delete the original column after copying | Formulas that referenced it will show errors |
The safest moves are Cut + Insert Cut Cells and Shift + Drag. Both tell Excel you’re relocating data, so it updates references. Copying and pasting does not do this.
If you’re unsure, press Ctrl + Z (Undo) immediately after moving and check your formulas first.
How to Rearrange Columns Using Sort
If you need to rearrange many columns at once, sorting by a helper row is cleaner than dragging things around one by one.
Here’s how:
- Insert a blank row above your headers (Row 1 or wherever your data starts)
- Number each column in that row in the order you want them: 1, 2, 3, etc.
- Select all your data including that row
- Go to Data > Sort
- Click Options and choose Sort left to right
- Sort by the row you just numbered
- Delete the helper row after sorting
This is especially useful when you’re reorganizing a report with 15 or 20 columns. You can plan the order first, number accordingly, then sort in one step.
Moving Columns in Excel Online
Excel Online (the browser version) supports column movement but has fewer options than the desktop app.
What works:
- Cut (Ctrl + X) and Insert Cut Cells via right-click menu
- Basic drag-and-drop (without the Shift trick)
What doesn’t work as smoothly:
- The Shift + drag method can be unreliable depending on your browser
- Some context menu options behave differently in Chrome vs Edge
If you’re doing heavy column rearranging, the desktop version of Excel gives you more control. Excel Online is fine for quick adjustments.
Moving Columns in Excel on Mac
On Mac, everything works the same way, just with different keyboard shortcuts:
| Action | Windows | Mac |
|---|---|---|
| Cut | Ctrl + X | Cmd + X |
| Undo | Ctrl + Z | Cmd + Z |
| Select column | Click column letter | Click column letter |
| Shift-drag move | Shift + drag | Shift + drag |
The Shift-drag method works identically on Mac. The Cut + Insert Cut Cells method is the same too. Right-click still brings up the context menu.
Common Mistakes When Moving Columns (and How to Avoid Them)
Mistake 1: Using paste instead of Insert Cut Cells
This overwrites your destination column. Always right-click the target column and choose Insert Cut Cells after cutting.
Mistake 2: Dragging without holding Shift
Without Shift, Excel asks if you want to replace the destination. If you click Yes by accident, that data is overwritten. Always hold Shift when dragging.
Mistake 3: Moving a column that other sheets reference
If another sheet in your workbook uses a formula like =Sheet1!B2, moving Column B on Sheet1 should update that reference. But it’s worth double-checking cross-sheet references after a move, especially in complex workbooks.
Mistake 4: Forgetting frozen panes
If you have frozen columns, moving a column can sometimes behave unexpectedly near the freeze boundary. Unfreeze panes first, rearrange, then re-freeze.
Moving Columns in Large Datasets
For very large spreadsheets (thousands of rows), the visual methods work fine since you’re moving whole columns, not copying cell by cell. Excel handles the shift quickly regardless of row count.
But if you’re regularly rearranging columns as part of a data workflow, it’s worth looking at Power Query. It lets you reorder columns as part of a repeatable transformation step, which is useful when you import data from external sources and always need the same column layout.
Microsoft’s own documentation on Power Query is worth bookmarking if you work with imported data regularly. You can find it at Microsoft’s Power Query documentation.
For anyone who wants to go deeper on Excel shortcuts and efficiency, Chandoo.org is one of the best resources I’ve found. Practical, no fluff.
Quick Reference: All Methods at a Glance
| Method | Best For | Risk Level |
|---|---|---|
| Shift + Drag | Quick single column moves | Low |
| Cut + Insert Cut Cells | Precise, controlled moves | Low |
| Sort by helper row | Rearranging many columns | Low |
| Copy + Paste | Moving data (not column structure) | Medium |
Conclusion
Moving a column in Excel is something you’ll do constantly, and it’s worth getting the technique right from the start. The Shift + drag method is your fastest option for everyday use. Cut + Insert Cut Cells gives you more precision. Both update your formulas automatically, so you’re not left chasing broken references.
The one rule to remember: never use regular Paste after cutting a column. Always go with Insert Cut Cells. That single habit will save you from data loss more times than you’d think.
FAQs
Can I move a column in Excel without losing the formatting?
Yes. Both the Shift + drag method and Cut + Insert Cut Cells preserve cell formatting, including colors, borders, fonts, and number formats. The formatting travels with the column data. The only time you might lose formatting is if you manually copy cell values using Paste Special with Values only.
Does moving a column affect pivot tables that use that data?
It depends on how the pivot table references the source data. If your pivot table is linked to a named Excel Table, moving columns inside that table is generally safe. If it references a fixed cell range like A1:F500, moving columns outside that range or restructuring the data can cause field errors. Always refresh your pivot table after any column rearrangement and check that all fields still map correctly.
Is there a keyboard-only way to move a column in Excel?
Not a direct one-step shortcut, but you can do it entirely with the keyboard. Select the column using Shift + Space, then cut it with Ctrl + X, navigate to the target column with arrow keys, right-click using the Menu key (or Shift + F10), and choose Insert Cut Cells. It takes a few extra keystrokes but works if you prefer keeping your hands off the mouse.
What happens to data validation rules when I move a column?
Data validation rules tied to a column move with it. If you set up a dropdown list or input restriction on a column, it stays attached to those cells after the move. The validation doesn’t need to be reconfigured. However, if your validation references cells in another column (like a list stored in Column H), verify those references still point to the correct location after the move.
Can I undo a column move if something goes wrong?
Yes. Press Ctrl + Z (or Cmd + Z on Mac) immediately after the move to undo it. Excel stores multiple undo steps, so even if you’ve made a few clicks since the move, you can usually get back to where you started. If you’ve saved the file after the move, Ctrl + Z won’t help, but you can check for AutoRecover versions under File > Info > Manage Workbook.

- How to Create a Presentation with AI (Step-by-Step) - June 19, 2026
- How to Restore Your Favorites List (Edge, Chrome, Firefox, Safari and More) - June 18, 2026
- How to Make Money with AI in 2026 (Real Methods That Actually Work) - June 18, 2026