If you’re looking to buy a telescope or just curious about how they work, you need to understand the three main types: refractors, reflectors, and compound telescopes. Each type uses different technology to gather and focus light, making them better suited for specific viewing tasks. This guide breaks down exactly what each telescope does, who should use it, and why it matters.
Why Telescope Type Matters
Choosing the wrong telescope wastes money and kills your excitement for stargazing. A refractor might show you crisp views of the Moon but struggle with faint galaxies. A reflector could reveal stunning deep-sky objects but need frequent maintenance. Understanding these differences helps you match the telescope to your actual needs, whether that’s planetary viewing, astrophotography, or exploring distant galaxies.
The Three Main Telescope Types
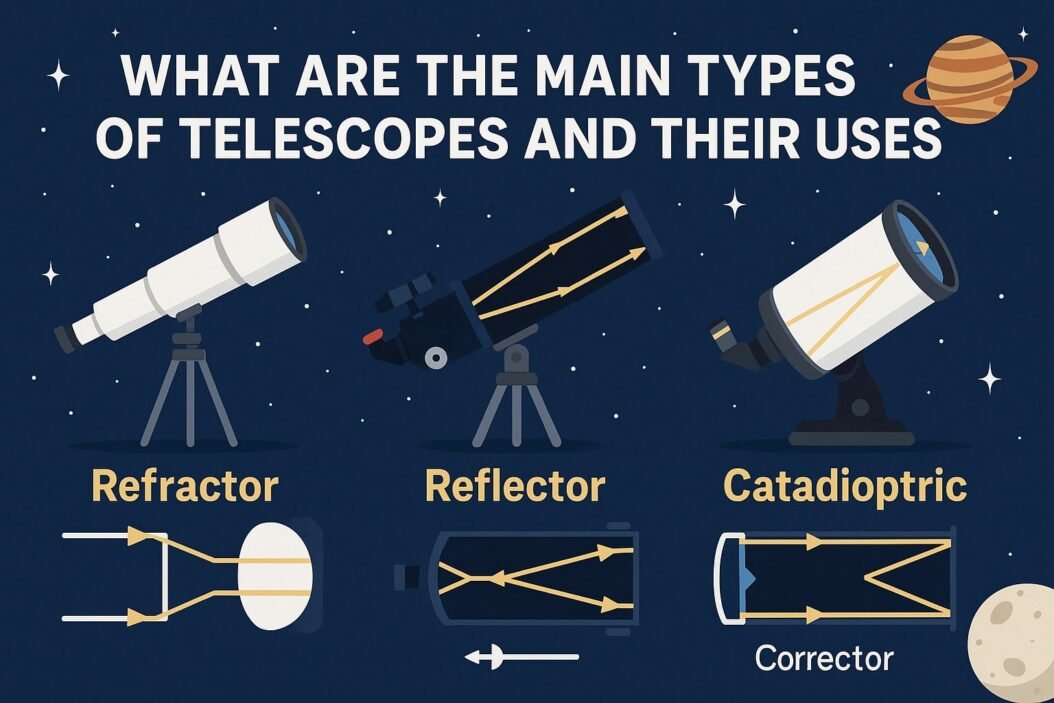
1. Refractor Telescopes (Lens-Based)
Refractors use glass lenses at the front of the tube to bend and focus light. This is the classic telescope design you probably picture in your mind.
How They Work
Light enters through the objective lens (the big lens at the front), which focuses it down the tube to a smaller eyepiece lens where you look. The two lenses work together to magnify distant objects.
Best Uses
- Viewing the Moon and planets (Jupiter, Saturn, Mars)
- Observing double stars
- Daytime terrestrial viewing (landscapes, wildlife)
- Beginner astronomy
- Astrophotography of bright objects
Advantages
- Sharp, high-contrast images with excellent detail
- Sealed tube protects optics from dust and moisture
- Requires almost zero maintenance
- No central obstruction means clearer views
- Ready to use immediately (no setup or alignment)
Disadvantages
- More expensive per inch of aperture
- Heavy and less portable in larger sizes
- Can show color fringing (chromatic aberration) on bright objects with cheaper models
- Limited to smaller apertures for most budgets
Who Should Choose a Refractor
You want a refractor if you’re a beginner, plan to observe mostly planets and the Moon, prefer low maintenance, or need a grab-and-go telescope for quick viewing sessions. They’re also excellent for people who want a telescope that “just works” without fussing.
Price Range: $200-$3,000+ depending on aperture and glass quality.
2. Reflector Telescopes (Mirror-Based)
Reflectors use curved mirrors instead of lenses to collect and focus light. Isaac Newton invented this design to solve the color problems that plagued early refractors.
How They Work
Light enters the open tube and hits a large curved mirror at the bottom (primary mirror). This mirror reflects light back up the tube to a smaller flat mirror (secondary mirror) angled at 45 degrees, which bounces the light out to the side where the eyepiece sits.
Best Uses
- Deep-sky observation (galaxies, nebulae, star clusters)
- Viewing faint objects that need maximum light gathering
- Beginner to advanced astronomy on a budget
- Large aperture viewing without breaking the bank
Advantages
- Cheapest cost per inch of aperture (more light-gathering power for your money)
- No chromatic aberration (no false color)
- Can build or buy very large apertures (8″, 10″, 12″+)
- Excellent for faint deep-sky objects
- Simple optical design
Disadvantages
- Open tube lets in dust, moisture, and air currents
- Mirrors need occasional realignment (collimation)
- Secondary mirror creates diffraction spikes on bright stars
- Bulkier and less portable than refractors of similar aperture
- May need 30+ minutes to reach optimal temperature
Who Should Choose a Reflector
Pick a reflector if you want maximum aperture for minimum cost, plan to observe primarily deep-sky objects, don’t mind basic maintenance, or have space to store a larger instrument. They’re perfect for intermediate astronomers ready to see fainter objects.
Price Range: $150-$1,500 for quality Newtonian reflectors.
3. Compound Telescopes (Catadioptric)
Compound telescopes combine lenses and mirrors in clever designs that fold the light path. This creates a shorter tube while maintaining long focal lengths. The two most common designs are Schmidt-Cassegrain (SCT) and Maksutov-Cassegrain (Mak).
How They Work
Light enters through a corrector plate (thin lens), hits the primary mirror at the back, reflects to a secondary mirror mounted on the corrector plate, then bounces back through a hole in the primary mirror to the eyepiece. The folded light path makes the tube much shorter than the actual focal length.
Best Uses
- Planetary and lunar observation with high magnification
- Astrophotography (especially with modern mounts)
- Observers who travel frequently
- Visual observation of both planets and deep-sky objects
- Serious amateur astronomy
Advantages
- Very portable despite long focal lengths
- Versatile for multiple types of viewing
- Sealed tube protects optics
- Good for both visual and photographic use
- Compact enough for airline travel (8″ models)
Disadvantages
- Most expensive telescope type per inch of aperture
- Long cool-down time (1-2 hours for large models)
- Heavier than they look due to thick corrector plate
- More complex optical system means more potential issues
- Often sold with computerized mounts that increase cost
Who Should Choose a Compound Telescope
Go with a compound telescope if you need portability with serious power, want one telescope for multiple purposes, plan to do astrophotography, have a decent budget, or need something that stores easily in small spaces.
Price Range: $500-$5,000+ depending on aperture and mount quality.
Quick Comparison Table
| Feature | Refractor | Reflector | Compound |
|---|---|---|---|
| Best For | Planets, Moon | Deep-sky, faint objects | All-purpose, portability |
| Maintenance | Almost none | Periodic collimation | Minimal |
| Cost (6″ aperture) | $800-$1,200 | $300-$500 | $600-$1,000 |
| Portability | Moderate | Low (bulky) | High |
| Image Quality | Excellent contrast | Good, wide field | Very good overall |
| Setup Time | Instant | 10-15 minutes | 5-10 minutes |
| Learning Curve | Beginner-friendly | Moderate | Moderate |
Understanding Aperture: The Most Important Number
Aperture is the diameter of the main lens or mirror. It’s the single most important specification because it determines how much light the telescope gathers. More light means you can see fainter objects and resolve finer details.
Why It Matters
- A 6-inch telescope gathers 4 times more light than a 3-inch telescope
- An 8-inch telescope gathers about 78 times more light than your dark-adapted eye
- Larger apertures reveal fainter galaxies, dimmer stars, and more detail on planets
The Aperture Rule: For visual observing, aperture matters more than magnification, optical quality, or brand name. A well-made 8-inch reflector will outperform a premium 4-inch refractor for most deep-sky viewing.
Secondary Considerations
Focal Length and Focal Ratio
Focal length (measured in millimeters) divided by aperture gives you the focal ratio (f-number).
- Low f-ratio (f/4 to f/6): “Fast” telescopes, wide field of view, better for deep-sky objects, shorter tube
- High f-ratio (f/10 to f/15): “Slow” telescopes, narrow field, better for planets and Moon, longer tube
Mount Types
The mount matters almost as much as the optical tube.
Alt-Azimuth Mounts: Move up-down and left-right. Simple, intuitive, lightweight. Good for beginners and visual observing. Poor for long-exposure astrophotography.
Equatorial Mounts: Aligned with Earth’s rotation axis. One motion tracks objects across the sky. Essential for astrophotography. Heavier and requires polar alignment.
Computerized Mounts: Include motors and databases to find and track objects automatically. Convenient but adds cost and complexity.
Specialized Telescope Types
Dobsonian Telescopes
A Dobsonian is actually a Newtonian reflector on a simple, sturdy alt-azimuth mount. John Dobson popularized this design to make large-aperture telescopes affordable.
Why They’re Popular
- Massive aperture for the price (8″, 10″, 12″, even 16″+)
- Rock-solid stability
- Simple, reliable design
- Best “light bucket” for visual deep-sky observing
- No electronics to fail
Limitations: Heavy, bulky, not portable, requires dark skies to appreciate fully.
Maksutov-Newtonian
Combines a Maksutov corrector with Newtonian reflector design. Less common but offers wide-field viewing with good correction.
Ritchey-Chrétien
Professional observatory design with hyperbolic mirrors. Used by Hubble Space Telescope. Extremely expensive but exceptional for astrophotography with zero coma.
Choosing Your First Telescope
For Beginners
Start with a 6-8 inch Dobsonian reflector if you have storage space and primarily want to observe deep-sky objects. Choose a 4-inch refractor if you prefer planets, want minimal maintenance, and need portability.
Avoid: Department store telescopes with exaggerated magnification claims. Any telescope advertised by magnification rather than aperture. Telescopes under $150.
For Planetary Observers
A 5-6 inch refractor or 8-10 inch Schmidt-Cassegrain gives the sharpest planetary views. High focal ratio (f/10 or longer) helps with magnification and contrast.
For Deep-Sky Enthusiasts
An 8-12 inch Dobsonian reflector provides the most bang for your buck. Large aperture reveals faint galaxies and nebulae. Pair it with quality wide-angle eyepieces.
For Astrophotographers
Start with an 80-100mm apochromatic refractor or 8-inch Schmidt-Cassegrain on an equatorial mount. You’ll need sturdy tracking and minimal optical aberrations.
Common Mistakes to Avoid
Buying too much magnification: Telescopes marketed as “600x power!” are scams. Useful magnification tops out around 50x per inch of aperture under ideal conditions. Beyond that, you’re just magnifying blur.
Ignoring the mount: A great optical tube on a wobbly mount creates frustration. The mount should be at least as stable as the tube is heavy.
Forgetting about eyepieces: Budget for 2-3 quality eyepieces. The eyepiece determines actual magnification and field of view. Many telescopes come with mediocre eyepieces.
Skipping research: Read reviews from actual users at Cloudy Nights or join an astronomy club before buying.
Underestimating portability needs: Will you actually use a telescope that requires 30 minutes of setup? Be honest about your lifestyle.
Accessories You’ll Need
- Eyepieces: Start with low power (25-32mm) for finding objects and medium power (10-15mm) for details
- Star diagonal: Makes viewing comfortable (refractors and compounds)
- Collimation tool: Required for reflectors
- Red flashlight: Preserves night vision while reading star charts
- Planisphere or phone app: Helps identify what you’re looking at
Maintenance Requirements
Refractors
- Wipe corrector lens occasionally with proper cleaning solution
- Store in dry location
- Annual: 5-10 minutes
Reflectors
- Check collimation before each session
- Clean mirrors every 1-2 years
- Realuminize mirrors every 10-20 years
- Annual: 2-3 hours
Compounds
- Clean corrector plate as needed
- Check collimation yearly
- Keep desiccant fresh if included
- Annual: 30-60 minutes
Where to Learn More
The Sky & Telescope website offers detailed telescope reviews, buying guides, and observing tips from experienced astronomers. Local astronomy clubs often host star parties where you can try different telescope types before buying.
Frequently Asked Questions
What telescope can see galaxies?
Any telescope with at least 6 inches of aperture can reveal dozens of galaxies under dark skies. An 8-inch Dobsonian reflector shows spiral structure in M51 and dust lanes in M31 (Andromeda Galaxy). Smaller scopes show galaxies as fuzzy patches. You won’t see Hubble-like color photos through any visual telescope, galaxies appear gray to the eye due to low light levels.
Do I need a computerized telescope?
No. Learning the sky manually teaches you constellations and improves your understanding. Computerized “GoTo” telescopes cost $200-500 more and still require proper setup. They help when you have limited viewing time or want to see many objects quickly. Start manual unless you’re certain the convenience justifies the cost.
Can telescopes work in the city?
Yes, but light pollution limits what you’ll see. Refractors and compounds excel at bright objects like the Moon, planets, and double stars that cut through city skies. Large Dobsonians show bright nebulae like Orion but struggle with faint galaxies. Consider light pollution filters for nebula observation.
How much magnification do I need?
Maximum useful magnification is about 50 times the aperture in inches under excellent conditions. A 6-inch telescope maxes out around 300x. Most observing happens between 50-150x where images stay sharp. Atmospheric turbulence limits magnification more than the telescope itself. Quality matters more than quantity.
What’s better for a complete beginner?
An 8-inch Dobsonian offers the best learning experience if you can handle the size (about 50 pounds total). You’ll see enough detail to stay motivated. A 4-inch tabletop Dobsonian or 70mm refractor works if space and budget are tight. Avoid cheap telescopes under $150—they create frustration, not wonder.
Conclusion
The best telescope type depends on what you want to observe, your budget, and practical considerations like storage space and portability. Refractors deliver stunning planetary views with zero maintenance. Reflectors provide maximum aperture for deep-sky exploration at the lowest cost. Compound telescopes balance portability with versatility but command premium prices.
For most beginners, an 8-inch Dobsonian reflector or 4-6 inch refractor provides the best combination of performance, value, and ease of use. Prioritize aperture over magnification claims, invest in a stable mount, and remember that the best telescope is the one you’ll actually use.
Clear skies and happy observing.

- How to Check Samsung Warranty in 2026: Complete Step-by-Step Guide - April 3, 2026
- How to Access Computer Configuration Settings in Windows 11/10 - April 3, 2026
- How to Check ASUS Warranty Status in 2026 (Step-by-Step) - April 3, 2026