If you want to show hidden files and folders on Windows, here is the fastest way: open File Explorer, click the View tab (Windows 10) or the View menu (Windows 11), then enable Hidden items. That is it. Your hidden files will appear instantly.
But there is more to know. This guide explains why files are hidden, how to use every method available in 2026, when you should and should not reveal hidden files, and what to do once you can see them. Whether you are troubleshooting a problem, recovering files, or just curious, this guide covers everything.
Why Windows Hides Files and Folders
Windows hides certain files and folders by default. This is a protection feature, not a restriction. Microsoft designed it this way to prevent accidental deletion of system files that Windows depends on to run properly.
There are two types of hidden items on Windows:
Hidden files are files or folders marked with the “hidden” attribute. These are usually created by apps or the system. A user or program can hide any file manually too.
Protected operating system files are a second layer. These are critical system files that stay hidden even when you turn on “show hidden files.” You need a separate setting to reveal them.
Understanding the difference matters because revealing system files carries more risk than just showing regular hidden files.
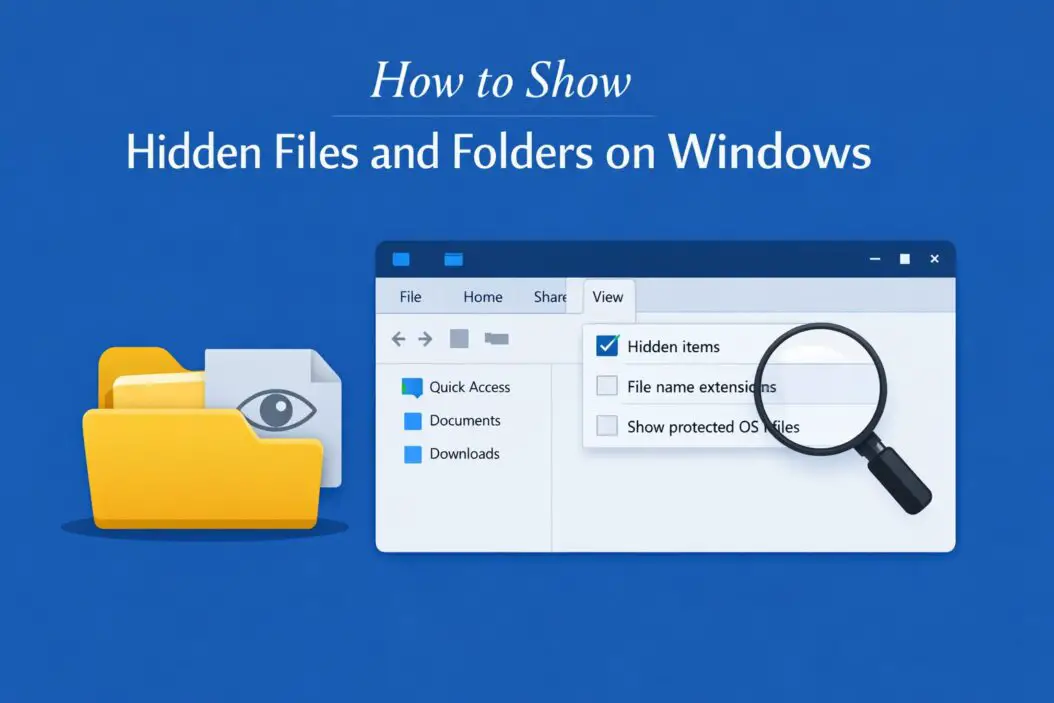
Method 1: Show Hidden Files Using File Explorer (Fastest)
This is the most straightforward way. No need to touch any settings app or registry.
On Windows 11
- Open File Explorer (press Windows + E).
- Click the View menu at the top.
- Hover over Show.
- Click Hidden items.
A checkmark will appear next to “Hidden items” and your hidden files will become visible right away. They appear slightly faded compared to normal files so you can tell them apart.
On Windows 10
- Open File Explorer.
- Click the View tab in the ribbon at the top.
- Find the Show/hide section on the right side.
- Check the box next to Hidden items.
Done. The change is immediate and applies to all folders you browse.
Method 2: Show Hidden Files Through Folder Options
This method gives you more control. It also lets you toggle the protected system files setting.
- Open File Explorer.
- Click the three-dot menu (Windows 11) or Options under the View tab (Windows 10).
- Select Folder and search options or Options.
- Go to the View tab inside that window.
- Scroll down in the Advanced settings list.
- Find Hidden files and folders.
- Select Show hidden files, folders, and drives.
- Click Apply, then OK.
While you are in this window, you will also see an option that says Hide protected operating system files (Recommended). Leave this checked unless you have a specific reason to uncheck it. Accidentally deleting a protected system file can cause serious Windows errors.
Method 3: Show Hidden Files Using Control Panel
Some users prefer the classic Control Panel route, especially on older Windows installs.
- Open Control Panel.
- Go to Appearance and Personalization.
- Click File Explorer Options.
- Click the View tab.
- Select Show hidden files, folders, and drives.
- Click Apply and OK.
This leads to the same Folder Options dialog as Method 2.
Method 4: Show Hidden Files Using Command Prompt
This method is useful for power users, IT admins, or when the graphical interface is unavailable.
Open Command Prompt as administrator (search “cmd” in the Start menu, right-click, select Run as administrator).
To view hidden files in a directory, type:
dir /a:h C:\YourFolderPath
The /a:h flag shows only hidden items. To show all files including hidden and system files:
dir /a C:\YourFolderPath
To remove the hidden attribute from a specific file and make it permanently visible:
attrib -h "C:\path\to\yourfile.txt"
To remove the hidden attribute from all files in a folder:
attrib -h "C:\YourFolder\*.*"
This does not just show the files temporarily. It actually removes the hidden attribute, making them permanently visible like any normal file.
Method 5: Show Hidden Files Using PowerShell
PowerShell offers a cleaner syntax and works well in scripts.
To list all hidden files in a directory:
Get-ChildItem -Path "C:\YourFolder" -Force -Hidden
The -Force flag reveals hidden and system files. The -Hidden flag shows only hidden items.
To recursively find all hidden files in a folder and its subfolders:
Get-ChildItem -Path "C:\YourFolder" -Recurse -Force -Hidden
To remove the hidden attribute from all files in a folder:
Get-ChildItem -Path "C:\YourFolder" -Recurse -Force | ForEach-Object { $_.Attributes = $_.Attributes -band (-bnot [System.IO.FileAttributes]::Hidden) }
PowerShell is especially useful when you are dealing with hundreds or thousands of hidden files and need to unhide them all at once.
Method 6: Show Hidden Files Using Registry Editor
This is an advanced method. Only use it if the other methods are blocked or not working, such as on a managed PC.
- Press Windows + R, type
regedit, and press Enter. - Navigate to:
HKEY_CURRENT_USER\Software\Microsoft\Windows\CurrentVersion\Explorer\Advanced - Find the value named Hidden.
- Double-click it and set the value to 1 to show hidden files (2 hides them).
- Also find ShowSuperHidden and set it to 1 to show protected system files.
- Close Registry Editor and restart File Explorer (or log off and back on).
You can restart File Explorer by opening Task Manager, finding “Windows Explorer” in the list, right-clicking it, and selecting Restart.
What Are Common Hidden Files You Might Find
Once you enable hidden files, you will notice a lot of new items. Most are harmless system folders. Here is what you will typically see:
| Item | Location | Purpose |
|---|---|---|
| AppData | C:\Users\YourName\ | Stores app settings and user data |
| ProgramData | C:\ | Shared app data for all users |
| pagefile.sys | C:\ | Windows virtual memory file |
| hiberfil.sys | C:\ | Hibernation file |
| $Recycle.Bin | C:\ | Deleted files storage |
| NTUSER.DAT | C:\Users\YourName\ | User registry hive |
| System Volume Information | C:\ | System restore points |
| desktop.ini | Various folders | Folder display customization |
| Thumbs.db | Image folders | Thumbnail cache |
You should not delete any of these unless you know exactly what you are doing. Many are critical for Windows to function properly.
How to Hide a File or Folder Again
If you want to re-hide a file after you are done working with it, right-click the file, click Properties, check the Hidden checkbox under Attributes, and click OK.
You can also use Command Prompt:
attrib +h "C:\path\to\yourfile.txt"
The +h adds the hidden attribute back.
Showing Hidden Files on a USB Drive or External Storage
Hidden files on USB drives work the same way. Once you enable “Show hidden items” in File Explorer, it applies across all drives including USB sticks and external hard drives.
This is useful when a virus or a program has hidden your files on a USB drive. Many people think their files are deleted when they are actually just hidden. After enabling hidden files, they appear again. You can then use attrib -h -s /s /d in Command Prompt (pointed at the USB drive letter) to bulk restore them.
The command for a USB drive at letter E: would be:
attrib -h -s /s /d E:\*.*
This removes both the hidden and system attributes from all files on the drive.
Show Hidden Files for Troubleshooting and Repair
Showing hidden files is often the first step when troubleshooting Windows problems. Here are situations where it matters:
Malware removal. Many viruses hide themselves in system folders. Seeing hidden files helps you spot suspicious items. Tools like Malwarebytes and Windows Defender work better when you can cross-reference what they flag. According to Microsoft’s official documentation on file attributes, the hidden attribute is a basic file property that any program can set, which is exactly what malware often does.
App configuration files. Many apps store their config files in AppData, which is hidden by default. If you need to edit a config, delete a corrupted settings file, or backup your app data, you need hidden files visible.
Recovering accidentally deleted files. Sometimes files are not deleted, just hidden. Enabling hidden files is step one before trying any recovery software.
Fixing missing desktop items. Desktop.ini files control how folders display on the desktop. If your desktop looks wrong, viewing hidden files lets you inspect and fix these config files.
Disk cleanup. hiberfil.sys and pagefile.sys can take up several gigabytes. Seeing them lets you decide whether to disable hibernation (which removes hiberfil.sys) to free up space.
For a deeper understanding of how Windows file attributes work at a system level, this overview from SS64 on the ATTRIB command is a reliable reference.
Should You Always Keep Hidden Files Visible?
It depends on how you use your computer.
If you are an advanced user, developer, or IT professional, keeping hidden files visible makes sense. You deal with config files, app data, and system paths regularly. Hiding them adds friction.
If you are a casual user or share your PC with others, it is safer to keep hidden files hidden. The risk of accidentally deleting something important is real. Windows hides these files for a reason.
A reasonable middle ground is to show hidden files only when you need them, then turn the setting back off. It takes about five seconds either way.
Difference Between Hidden Files and System Files
This comes up often and confuses people. They are not the same thing.
| Type | Controlled By | Risk if Deleted |
|---|---|---|
| Hidden files | “Show hidden items” setting | Low to medium |
| Protected system files | “Hide protected OS files” setting | High |
System files carry the system attribute in addition to the hidden attribute. They require both settings to be changed before they become visible. Windows warns you with a pop-up when you try to disable the “Hide protected operating system files” option because deleting them can make Windows unbootable.
Never uncheck the “Hide protected operating system files” option unless you have a very specific technical reason, like working in recovery mode or doing advanced system work.
Quick Comparison of All Methods
| Method | Best For | Skill Level |
|---|---|---|
| File Explorer View menu | Everyday users | Beginner |
| Folder Options dialog | Detailed control | Beginner |
| Control Panel | Classic interface users | Beginner |
| Command Prompt attrib | Bulk changes, scripts | Intermediate |
| PowerShell | Scripting, automation | Intermediate |
| Registry Editor | Locked-down PCs | Advanced |
Conclusion
Showing hidden files and folders on Windows is simple once you know where to look. The quickest way is through File Explorer’s View menu. For more control, use Folder Options. For bulk changes or scripted workflows, use Command Prompt or PowerShell.
The key thing to remember is that most hidden files are hidden for a reason. Look, but be careful about deleting. Revealing hidden files is a powerful troubleshooting tool, not an invitation to clean house. Once you find what you needed, consider turning the setting back off to protect your system from accidental changes.
Whether you are chasing down a virus, recovering files from a USB drive, or editing an app config, you now have every method you need for 2026 and beyond.
Frequently Asked Questions
Why can I not see hidden files even after enabling the option?
Sometimes a Group Policy set by an administrator on a managed PC overrides your Folder Options setting. In that case, the Registry Editor method may work if you have admin rights. Also check if the option reverts itself after you click OK, which is a sign of Group Policy enforcement or malware actively hiding itself.
Is it safe to show hidden files on Windows?
Yes, showing hidden files is safe. Viewing them does not change or damage anything. The only risk comes from editing or deleting hidden files without knowing what they do. Browse freely, but be careful before you touch anything.
How do I show hidden files on Windows 11 specifically?
Open File Explorer, click View at the top, hover over Show, and click Hidden items. That is all it takes on Windows 11. The interface changed from Windows 10, but the function is the same.
Why did my hidden files disappear again after a restart?
This usually happens when malware is actively rehiding itself after every reboot. Run a full malware scan with Windows Defender or Malwarebytes. It can also happen on managed corporate computers where Group Policy resets your settings. Another cause is an app that resets Folder Options on startup.
How do I permanently unhide a file so it never gets hidden again?
Right-click the file, go to Properties, and uncheck the Hidden attribute. Or use attrib -h "filepath" in Command Prompt. This removes the hidden attribute permanently. The file will stay visible regardless of your Folder Options setting. To prevent any app from re-hiding it, you can also set the file to read-only, though that prevents editing too.

- How to Fix Overscan on Windows 11/10: Stop Your Screen Getting Cut Off (2026) - April 1, 2026
- How to Disable Lock Screen on Windows 11/10 in 2026 - April 1, 2026
- Top 7 NFT Integration Ideas for Brands in 2026 - March 31, 2026